Pilgrims Virtual Hike FAQs
How to set up progress tracking via the Pilgrims Event App
1) Download the Pilgrims Event App for your smartphone for FREE from the App Store or Google Play.
2) Open the Pilgrims Event App and make sure you are viewing the walking events tab.
3) Click on the relevant walking event to view its full details.
4) Scroll down to the route section and click on the 'I'm going' button.
5) At this stage, you will be asked to log into your MapMyTracks account. If you don't already have one, simply click 'Need an account?' and you can quickly set one up for free.
6) Once you have logged into your MapMyTracks profile on the Pilgrims Event App and clicked the 'I'm going' button, you are ready to start recording your first walk. After the event start date, you will appear on the event map/tracker alongside many other participants viewable via the Pilgrims Event App.
Please note that you do not need to select any of the 'Track Live' features in order to record your walks and take part in the Virtual Hike. 'Track Live' is a separate feature for premium MapMyTracks users and isn't required.
How to track you walking activities so they count
There are two ways to add your walking activities to the event map/tracker; by recording a GPS activity using your smartphone or by manually entering the distance via the Pilgrims Event App or MapMyTracks website. These two methods are explained below:
Recording your walks
1) To record your walks, you will need to use our companion app, MapMyTracks, which works in unison with the Pilgrims Event App. This is free to download from the App Store or Google Play via these links.
2) Once installed to your device, open the Map My Tracks App to the home screen and select the '+' symbol along the bottom of the screen. This will open up a new activity ready for you to begin recording.
3) Important before pressing GO: Check that the activity type is set to 'walking' as this is required for your activity to count towards your overall progress along the event map/tracker. At the end of your activity, you must also ensure that the activity is set to 'public'. Private activities will not show as progress on the cumulative distance tracker.
Entering your distance manually
There are two methods for adding manual activities.
App method
1) Open the Pilgrims Event App and click on the 'head' icon in the top right-hand corner of the screen to visit the profile screen. Here you will see a list of your most recent activities, including previous manual activities and GPS record activities.
2) Click on the orange 'Upload' button and fill in the relevant details for the manual activity you wish to add; ensuring that you keep it set to public. (i.e. leave the privacy checkbox unchecked).
3) Once you have filled in the date, distance, time and duration of your activity, click 'Save activity' and the distance will instantly be added to your total progress along the event map. The new activity will also appear as the latest activity on your profile screen.
Website method
1) Visit www.mapmytracks.com and log in to your account.
2) Once you have logged in, you will see a home page with various menu options along the top right of the screen. Click on the 'Upload' option and select 'Add Manual Entry from the drop down menu.
3) You will then be able to fill in a few details about your recent activity in order to manually add your distance towards your overall progress along the event map/tracker.
4) Important: Check that the activity type is set to 'walking' as this is required for your activity to count towards your overall progress along the event map/tracker. You must also ensure that the activity is set to 'public'. Private activities will not show as progress on the cumulative distance tracker.
Paper-based method
![]()
We also have a printable mile tracker for those who just want to keep things simple with pen and paper.
Once you have signed up to the virtual hike, you'll receive all the information you need via an email, including how to download a printable way to track the miles you walk throughout the challenge. Simply, fill in the number of miles you walk into each day until you've reached your goal.
The mile tracker is also a great visual way to show your friends and family how far you've come and ask them to donate!
If you experience difficulty with following the instructions above, you can contact Robert Grew at [email protected] or (Mon-Fri, 9am-5pm) on 07710 854029. We also have a handy Frequently Asked Questions page.
My activity hasn't moved me along the map. What can I check?
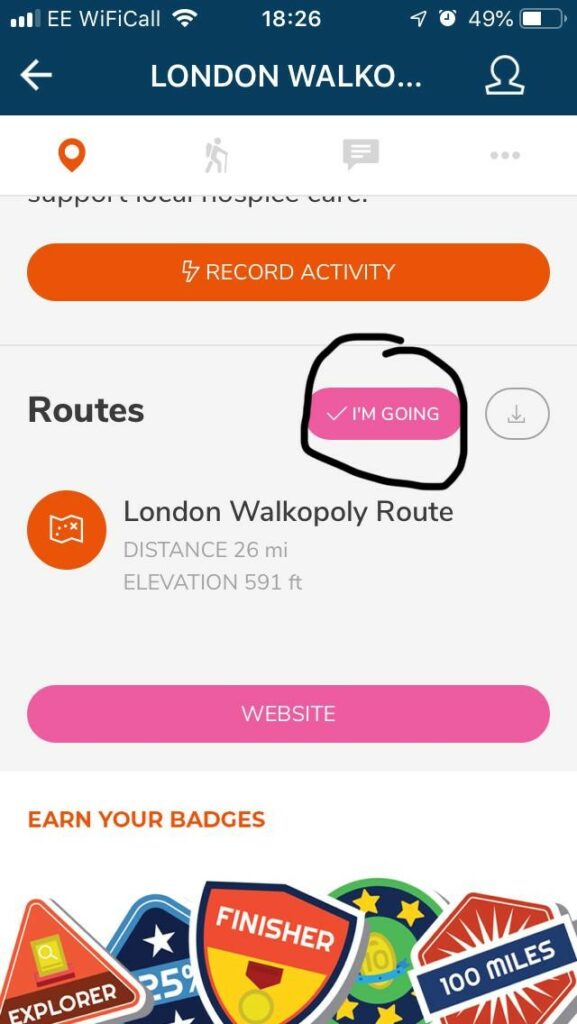
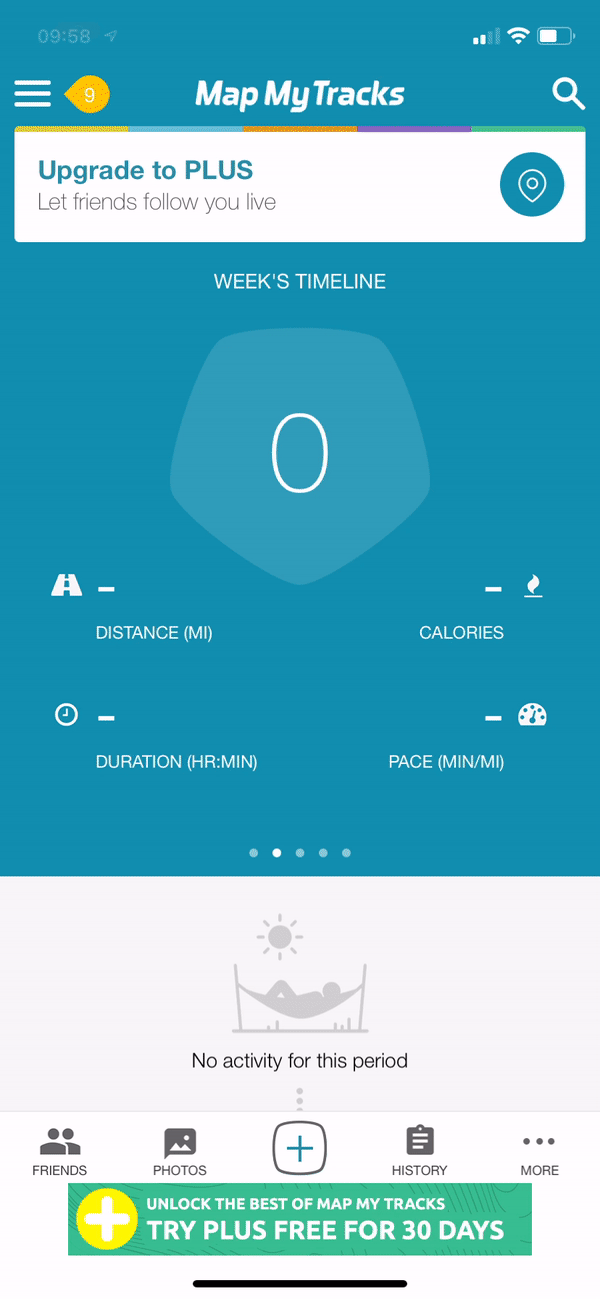
- That you have ticked the pink 'I'm going' button for the event within the Pilgrims Event App (Fig 1.). The button can be found by scrolling down in the event to where the route is listed.
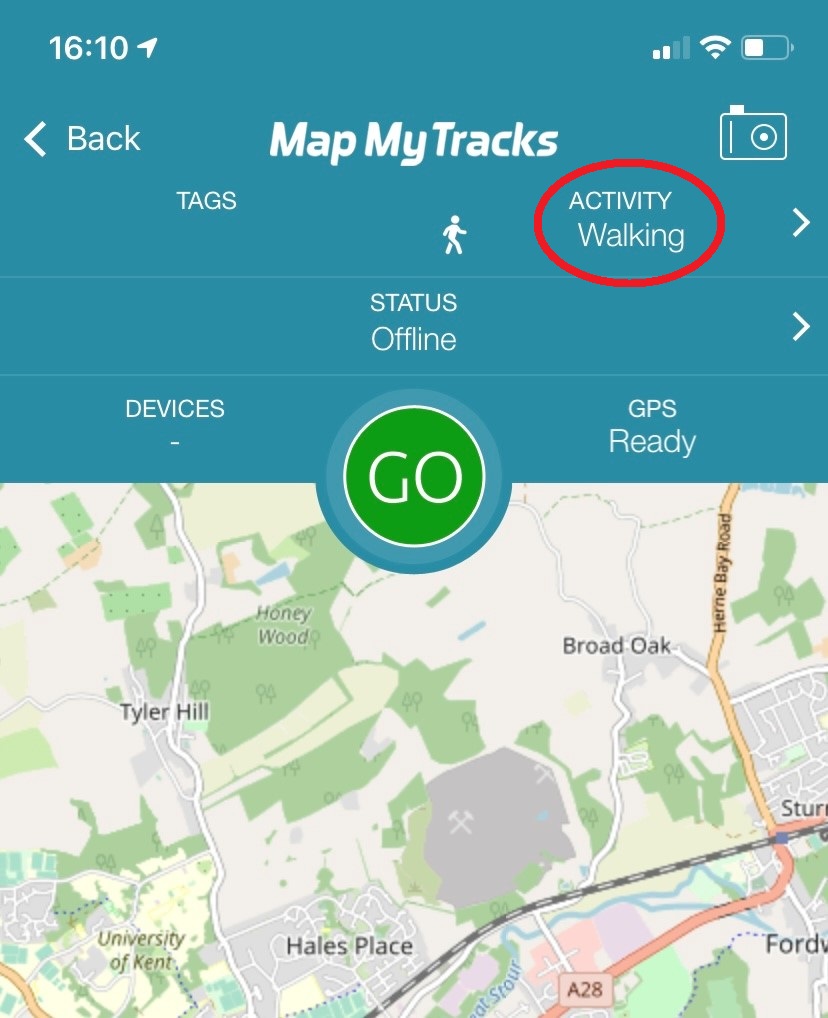
- That the activity type is set as 'walking'. Only activities entered into Map My Tracks as 'walking' within the event time frame will count towards your overall progress on the map (Fig 2.).
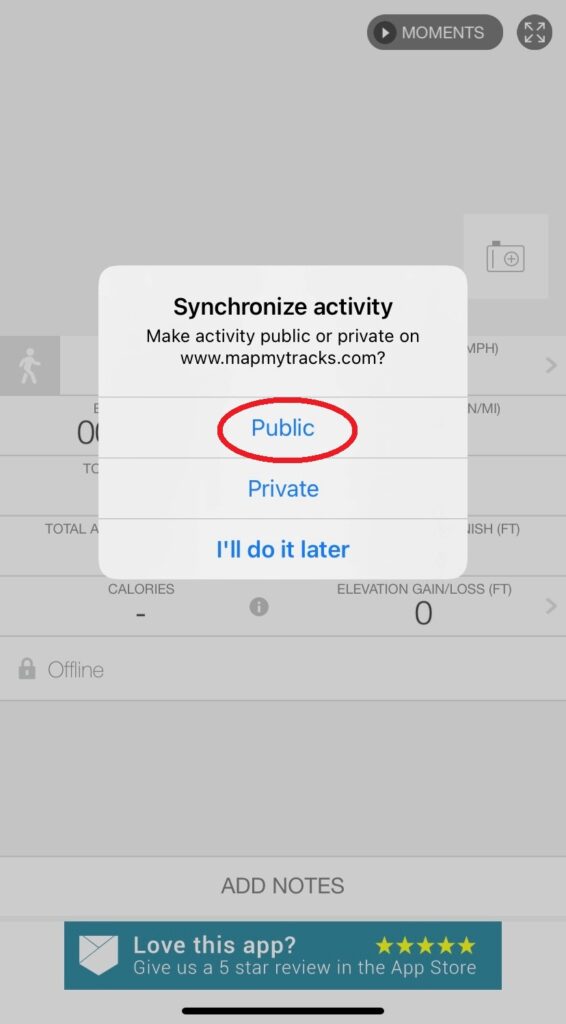
- At the end of recording your walk, you must select to save it as a 'public' activity in order for it to show your progress in the route map (Fig 3.).
My phone isn't recording my whole activity. What can I check?
- Open the Map My Tracks App and press the three lines icon in the top-left of the home screen to open the options sidebar.
- Open the 'Settings' section of the sidebar.
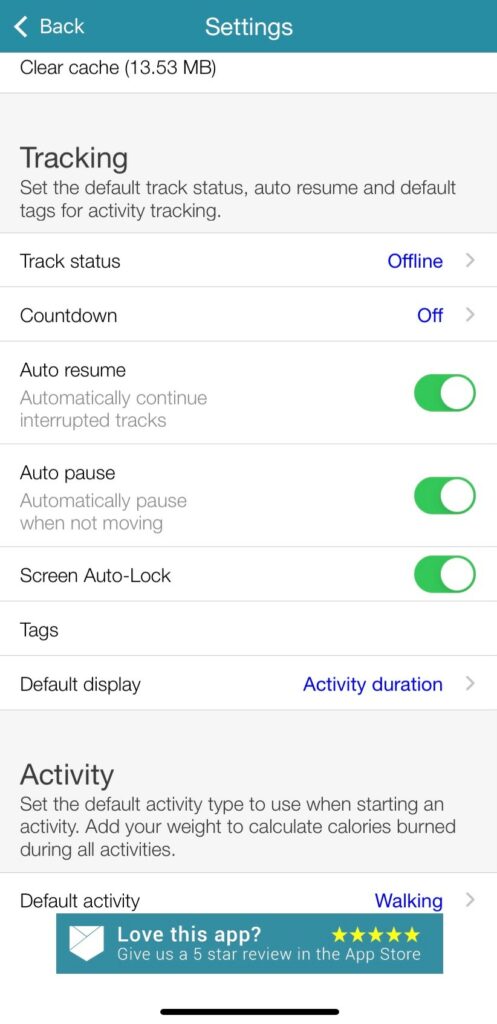
- Then, scroll down to the subheading 'Tracking' and you'll see that there is an option for both 'Auto Pause' and 'Auto Resume'. You should ensure that either these are both set as off or both on. If auto pause is on but auto resume is off, your activities will pause when it detects you've stopped moving but not resume again.
How to set my default activity in the Map My Tracks app.
- Open the Map My Tracks app and tap the three lines icon in the top-left of the home screen to open a side menu of options.
- From that side menu, select 'Settings' and then scroll down through the various settings until you see the 'Default activity' option.
- Change the Default Activity to be 'Walking' and voila! Every time you start a new recording it will already be set as walking.
How to add a manual activity to Map My Tracks
If you prefer recording your walks on another fitness app, or simply forgot to record a walk but want it to still count, you can manually add these activities to your Map My Tracks account. Here's how:
Method one
- Open the Pilgrims Event App and click on the 'head' icon in the top right-hand corner of the screen to visit the profile screen. Here you will see a list of your most recent activities, including previous manual activities and GPS record activities.
- Click on the orange 'Upload' button and fill in the relevant details for the manual activity you wish to add; ensuring that you keep it set to public.
- Once you have filled in the date, distance, time and duration of your activity, click 'Save activity' and the distance will instantly be added to your total progress along the event map/tracker. The new activity will also appear as the latest activity on your profile screen.
Method two
- Log into your Map My Tracks account at www.mapmytracks.com.
- Click 'Upload' from the menu bar and select 'Add manual activity' from the drop down options.
- Fill in the details of your activity such as time. date and distance, making sure the activity type is set as ‘walking’ and that visibility is set to public. Then, hit ‘Add activity’ and you’re all done!
The activity will now display in your overall progress along the event map/tracker.
How to delete a manual activity from my Map My Tracks account
There may be occasion when you need to delete a manual activity within your Map My Tracks account.
This can be done via the following steps:
- Log into your Map My Tracks account at www.mapmytracks.com via an internet browser.
- Click 'Activities' from the menu bar and select 'My Activities' from the drop down options.
- Then, scroll down until you find the activity you wish to delete. Click anywhere on the grey box for that activity in order to open it.
- Once you have opened the activity, you will see an option called 'Actions' on the far right of the screen. Select 'Actions' and you will see the option to delete the activity.
How to edit a recorded or manual activity in Map My Tracks
There may be occasion when you need to amend the settings on a recorded activity or manual activity within your Map My Tracks account.
This can be done via the following steps:
Map My Tracks App method (edit recorded activities only)
- Open the Map My Tracks app and from the home screen open the 'History' tab.
- Once in the 'History' page, you'll see a list of your recent activities. Scroll to find the activity you wish to amend and tap the 3 grey dots in the top-right corner of the activity map. This shows a list of options, from which select 'Edit'.
- In the 'Edit' screen, you can change a number of aspects to make your activity appear as progress on the map/tracker. Status must be set as 'Online public', Activity must be set as 'Walking' and the date must be within the date range of the event and not in the future).
Map My Tracks Website method (edit both recorded and manual activities)
- Log into your Map My Tracks account at www.mapmytracks.com.
- Click 'Activities' from the menu bar and select 'My Activities' from the drop down options.
- Then, scroll down until you find the activity you wish to edit. Click anywhere on the map for that activity in order to open it.
- Once you have opened the activity, you will see an option called 'Actions' on the far right of the screen. Select 'Actions' and you will see a variety of settings that can be edited. These include the activity type and privacy setting of the activity, which should be set as 'walking' and 'public' respectively for your activity to show on the virtual route map/tracker.
You cannot, however, edit the distance of an existing activity.
- If you are missing miles, these can be added by creating a new manual activity for the extra distance.
- If you have accidentally recorded or added too many miles, you will need to delete the erroneous activity and add a new manual activity for the correct distance.
Does using Map My Tracks affect my phone's battery life?
- Lower the screen brightness setting
- Decrease the time it takes for the phone to go to sleep
- Close unneeded apps that are open in the background
- Turn off things such as bluetooth and wifi
If you are experiencing battery issues, the beauty of this event is that you don't have to use the Map My Tracks app (or any fitness app) at all, and still track your progress by entering it manually!
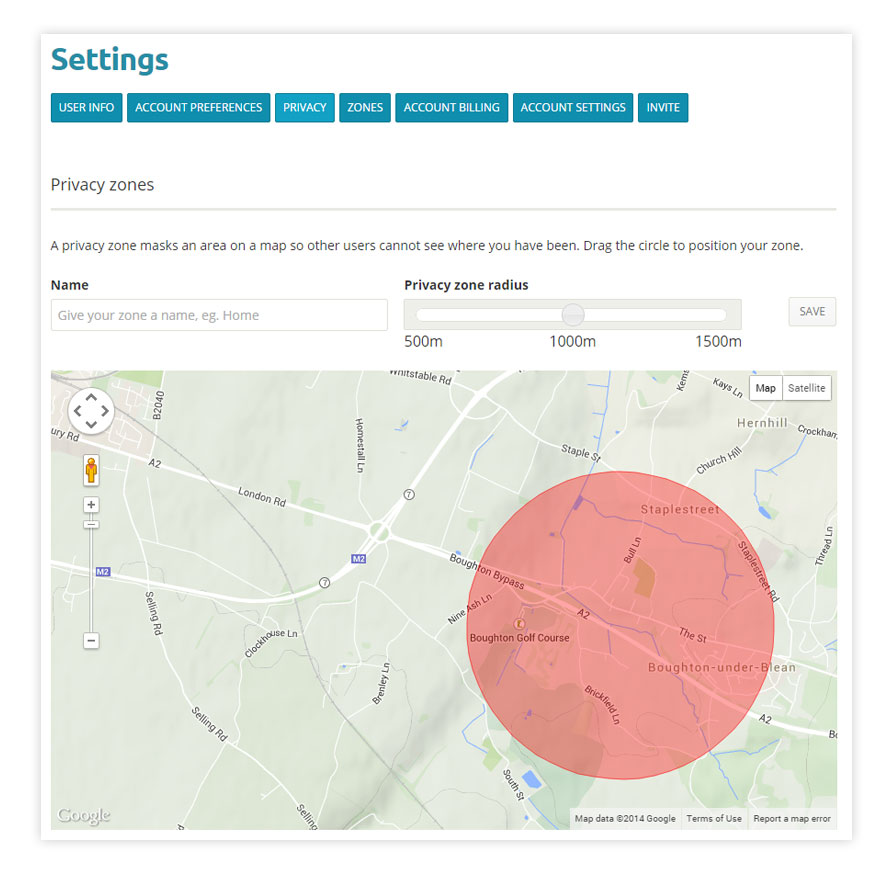
Setting up a privacy zone around my house or work.
Whilst we’re being asked to exercise close to our homes, we want you to feel safe if you’re starting your walks from home or work by setting up privacy zones. We always recommend starting your tracking device a short distance into your walk to minimise security ramifications. In addition, you can set up privacy zones to hide these sensitive locations from appearing on your activity maps.
Your activity within a privacy zone is hidden from other users and only displayed to you. These zones will apply to all types of activities (e.g. cycling, running, walking).
To set up a privacy zone:
- Log into your account at www.mapmytracks.com.
- Click on your username in the top-right corner to display a list of options and select 'Settings'.
- Click on the subheading button 'Privacy'.
- Then click 'Create a privacy zone' to define the area.
You can read more on the Map My Tracks blog here.
What are Achievements?
Achievements are an exciting new feature within the Pilgrims Event App. During your Virtual Hike, as well as the digital milestone badges along the way, you can now earn badges within the app for completing all kinds of Achievements.
The app will automatically recognise when you have achieved the criteria for any of the badges and add it to the 'Achievements' page within the 'Profile' area of the Pilgrims Event App, together with the date that you earned it!
Eg. Once you have recorded your first walk during an event, either by MapMyTracks recording or by a manual upload, you will earn the Off the Mark badge.
Full list of walking badges to achieve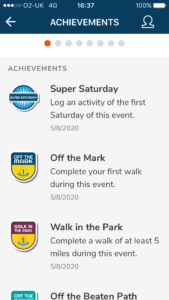
- Off the mark: Complete your first walk during this event.
- Trailblazer: Complete ten walks during this event.
- Walk in the Park: Complete a walk of at least 5 miles during this event.
- Off the beaten Path: Complete a walk of at least 10 miles during this event.
- Finding your Stride: Cover at least 25% of the event distance.
- On the Right Track: Cover at least 50% of the event distance.
- On the Home Stretch: Cover at least 75% of the event distance.
- Finisher: Complete the full event distance and cross the finish line.
- Backyard Explorer: Log over 10 hours of walking during this event.
- Scrapbooker: Upload at least one photo during this event.
- Super Saturday: Log an activity on the first Saturday of this event.
- Hill Seeker: Climb the height of Ben Nevis (1345 m) during this event.
Where can I view the event map/tracker to see my progress?

How to customise my map marker
- Click on your username from the menu bar and select ‘Settings’ from the drop down options.
- In the ‘User Info’ tab you can upload a profile photo which will appear within the coloured frame of you map marker.
- In the ‘Account Preferences’ tab you can change the colour of your marker from blue to red, green, purple, yellow or orange!
Can I tell exactly how far I am along the event map/tracker?
Yes! Within the Pilgrims Event App, head into the event you are taking part in and then open the participant list (the second menu tab). You'll see that your total distance is displayed underneath your name.
Can I take part without a smartphone or Facebook?
You certainly can! Social media and smartphone apps aren't for everyone and you can still track your progress without those things.
All you need to do is access the Map My Tracks website and the Pilgrims Hospices website via a computer, iPad or whatever device you have available.
The first site you’ll need to visit is www.pilgrimshospices.org/get-involved/events-and-challenges. This is where you can sign up the your chosen virtual event via the ‘Register Now’ button. Entry is £5. If you scroll down the web page you will see the interactive map. This is where you’ll appear once you begin walking. Click the blue button at the base of the map to load the rider positions.
Once you have registered for the hike, the second website you’ll need is www.mapmytracks.com. Create a free Map My Tracks account and then, from the homepage click on the ‘Events’ option in the menu bar and then ‘Find events’ from the drop down options. Search the events for one you are taking part in and click on it to open the event. On the next page click on the small grey ‘Attend’ button to add yourself onto the event.
At this point you are all set up and it’s time to log your miles!
To make yourself move along the route map, you’ll have to manually add your miles to your Map My Tracks account. This is easily done by selecting ‘Upload’ from the menu bar and clicking ‘Add manual entry’ from the drop down options. Then fill in the relevant details on your activity, ensuring to set the activity type as ‘walking’ and the visibility as ‘public’. Once you click ‘Add entry’ at the bottom you’re all done. Your marker will appear on the map at the total distance you have entered.
![]() We also have a printable mile tracker for those who just want to keep things simple with pen and paper.
We also have a printable mile tracker for those who just want to keep things simple with pen and paper.
Once you have signed up to the virtual hike, you'll receive all the information you need via an email, including how to download a printable way to track the miles you walk throughout the challenge. Simply, fill in the number of miles you walk into each day until you've reached your goal.
The mile tracker is also a great visual way to show your friends and family how far you've come and ask them to donate!
Can my jogs or runs count towards my progress?
They certainly can! As long as you take on the challenge on your own two feet. While the Pilgrims Virtual Hike is primarily a walking challenge, you can use miles that you rack up on jogs and runs towards your overall progress. However, in order for these activities to count, you will have to record them as the activity type 'Walking' via your Map My Tracks Account.
Remember, this is not a race and people will progress along the virtual route map at different paces throughout the month.
How much is it to enter?
Entry for a Pilgrims Virtual Hike is just £5 per person. Once signed up you will receive detailed instructions on how to track your hikes on the event map/tracker, bespoke digital badges to share at key milestones of your journey and dedicated support from our Pilgrims fundraising team for any virtual hike help you might need.
Every participant who finishes the full distance of a virtual hike will also be entered into the Hiker's Hall of Fame.
Should I raise sponsorship?
We would encourage you to raise as much sponsorship as you can for your Virtual Hike (after all, it’s no easy feat to hike all that way!). We've made it really easy to set up an online sponsorship page and start fundraising alongside your fellow hikers - just follow this link to the Virtual Hike: Pyramids of Egypt JustGiving page.
Start raising sponsorship today!
Alternatively, if you'd rather not ask your friends and family to sponsor you, we hope you might consider making a personal donation towards the care we provide. This can be done when you sign up or at any time on our website donation form. Just put the event name as the reason for your donation.
By doing your part for Pilgrims Hospices, you’ll truly be making a difference to the lives of our patients. Here’s how:
- £10 could pay for a patient’s meals for the day
- £25 could pay for an hour of nursing care
- £30 could pay for our Community Team to hold a video consultation with a patient in their own home
- £45 could pay for a virtual counselling session for an individual coping with the loss of a loved one
- £100 could pay for all the medicine needed at one of our inpatient units over 24 hours
Events like these help us to continue caring for local people as they near end of life. Please download a sponsorship form, set up your own online fundraising page with Just Giving, or call 01227 812 609. Don’t forget to encourage your sponsors to tick the Gift Aid box if they’re eligible to do so; for every £1 donated, we’ll be able to claim an extra 25p from the Government at no cost to you or your sponsors. It makes a huge difference.
How tough is it?
There’s no denying it – finishing the full distance on your virtual hike will take dedication and determination. But don't forget that you have as long as you need to complete it and you can break the distance down over as many days, weeks as you need to suit your free time and ability level.
Example
The Virtual Hike: Pyramids of Egypt is a 50-mile challenge in total but, broken down across March, that works out at at just 1.6 miles per day!
Earning digital badges for key milestones on your journey
There are digital badges that you earn for reaching key landmarks/milestones along your virtual journey. These are sent to you in your confirmation email when you sign up to the virtual hike. You are provided with these badges at the beginning of your hike so that you have the freedom to share them with friends, family and sponsors at the most relevant time for you.
Do I get anything at the end of my Virtual Hike?
As well as the satisfaction of watching your progress along the map/tracker, improving fitness, earning digital badges and fundraising rewards, you'll receive a certificate in the post for completing your virtual challenge.
Along with this certificate, there is one more accolade awaiting all walkers who achieve the full distance...
Every participant who reaches the finish line will have their name entered into the Virtual Hiker's Hall of Fame!
The Map My Tracks username of every participant who reaches the finish line of a virtual hike will be displayed alongside your fellow finisher's as a permanent online monument to your achievement. Hosted right here on the Pilgrims Hospices Website.